
Reno update (plus floor plan V784 🤦🏻♀️)
My renovation plans have had to change (again!).
In this post I’m sharing why I’ve had to change what I thought was our final plan as well as the latest version I’ve been working on this week - which in the end I’m much happier with anyway.
I want to document our full renovation journey on the blog so this is one of those posts that is a bit more for my own selfish reasons - but if you like to study floor plans as a hobby (like I do!) then perhaps you’ll find it interesting anyway :)
Why things have had to change again…
Earlier this week I met with an underpinner - this is someone who helps with renovating basements and making structural changes under your floor line. We had arranged the meeting to discuss the logistics and potential costs involved in creating our internal access/stairs from our garage into the house.
In earlier posts about our renovation (you can read here) you may recall that one of the things we were hoping to do was to dig out some of the area next to our existing garage to create a mudroom, gym and internal stairs in to the house.
So that’s what we had arranged the meeting about and I honestly thought it was going to be relatively straight forward as there’s plenty of room down there and to me it looked pretty doable - so was more just a case of what it might cost.
BUT…
After meeting with the underpinner I’ve now come to realise that it’s much more complicated than I first thought and as he said to me “if you go ahead with this it will be the most expensive mudroom in history”….good way to talk yourself out of a job LOL!
Anyway - the ballpark he gave me on the spot was about $100,000-$150,000 just for the basement works but even if we do go ahead with that there isn’t enough room for the gym, due to piers being in the way - so that would just be for a (smaller than I wanted) mudroom and stairs.
So that doesn’t seem worth it to us…!
And it means I’m now back to adjusting the floor plan again, which I’ve been doing over the past few days while I’ve been sick with COVID (boo!).
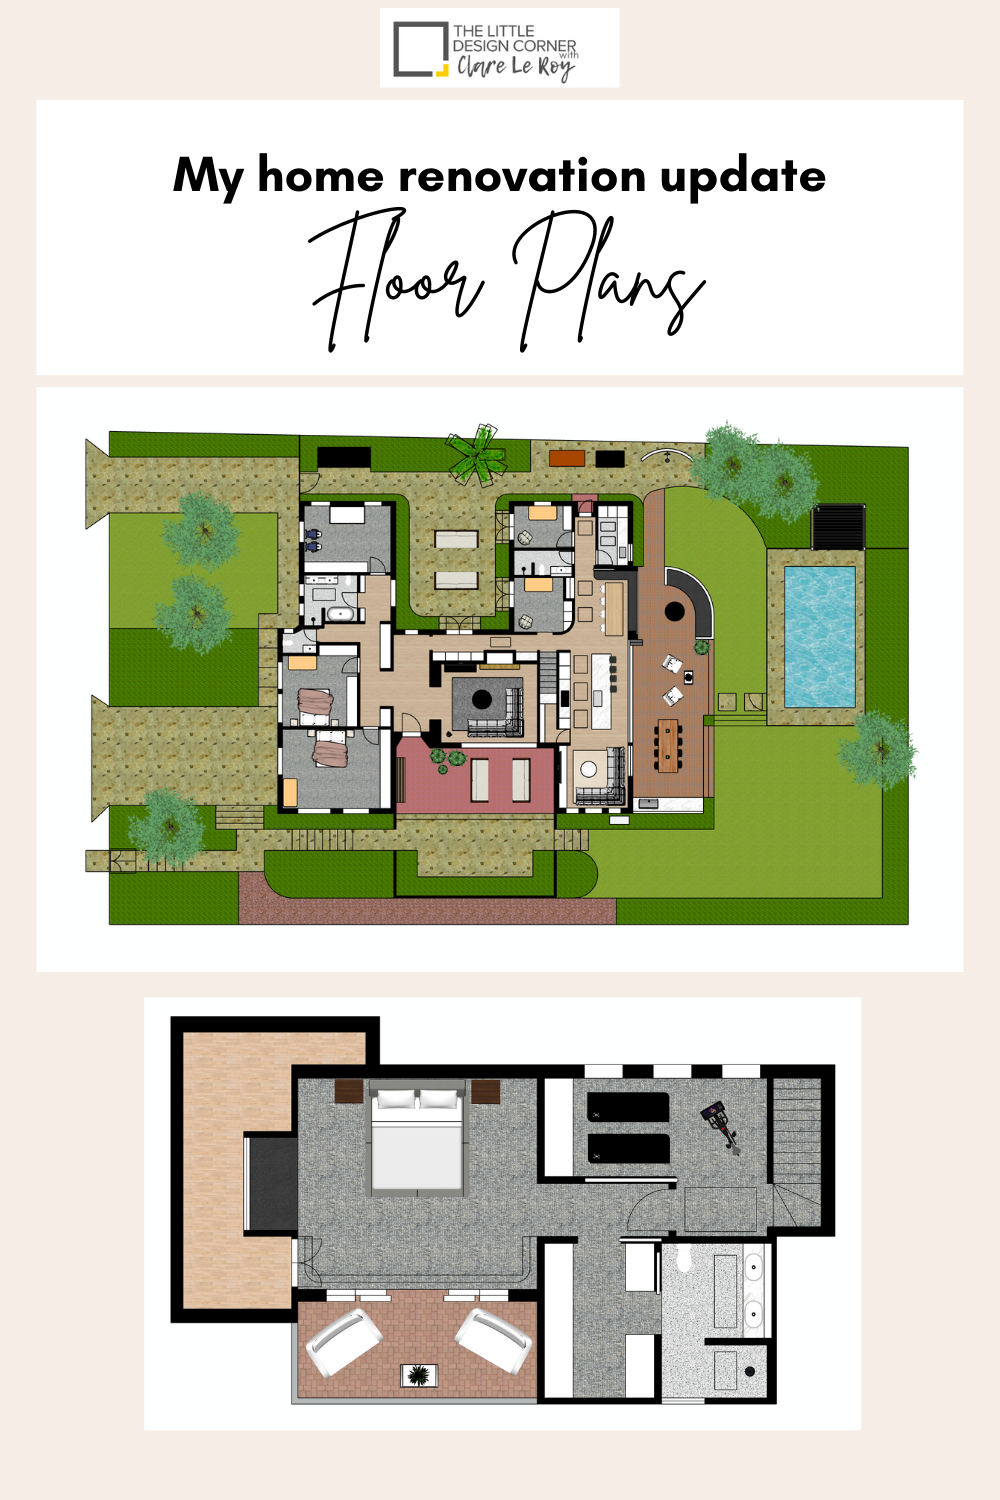
Here’s what is new…
Main level
This has ended up changing quite a bit since the last time I shared it.
Here’s what’s new with this version:
✅ instead of internal stairs we will renovate existing separate toilet (over on LH side of plan near boys’ bedrooms). An additional toilet for the boys won’t be a bad thing anyway as we often have fights over the shared bathroom situation!
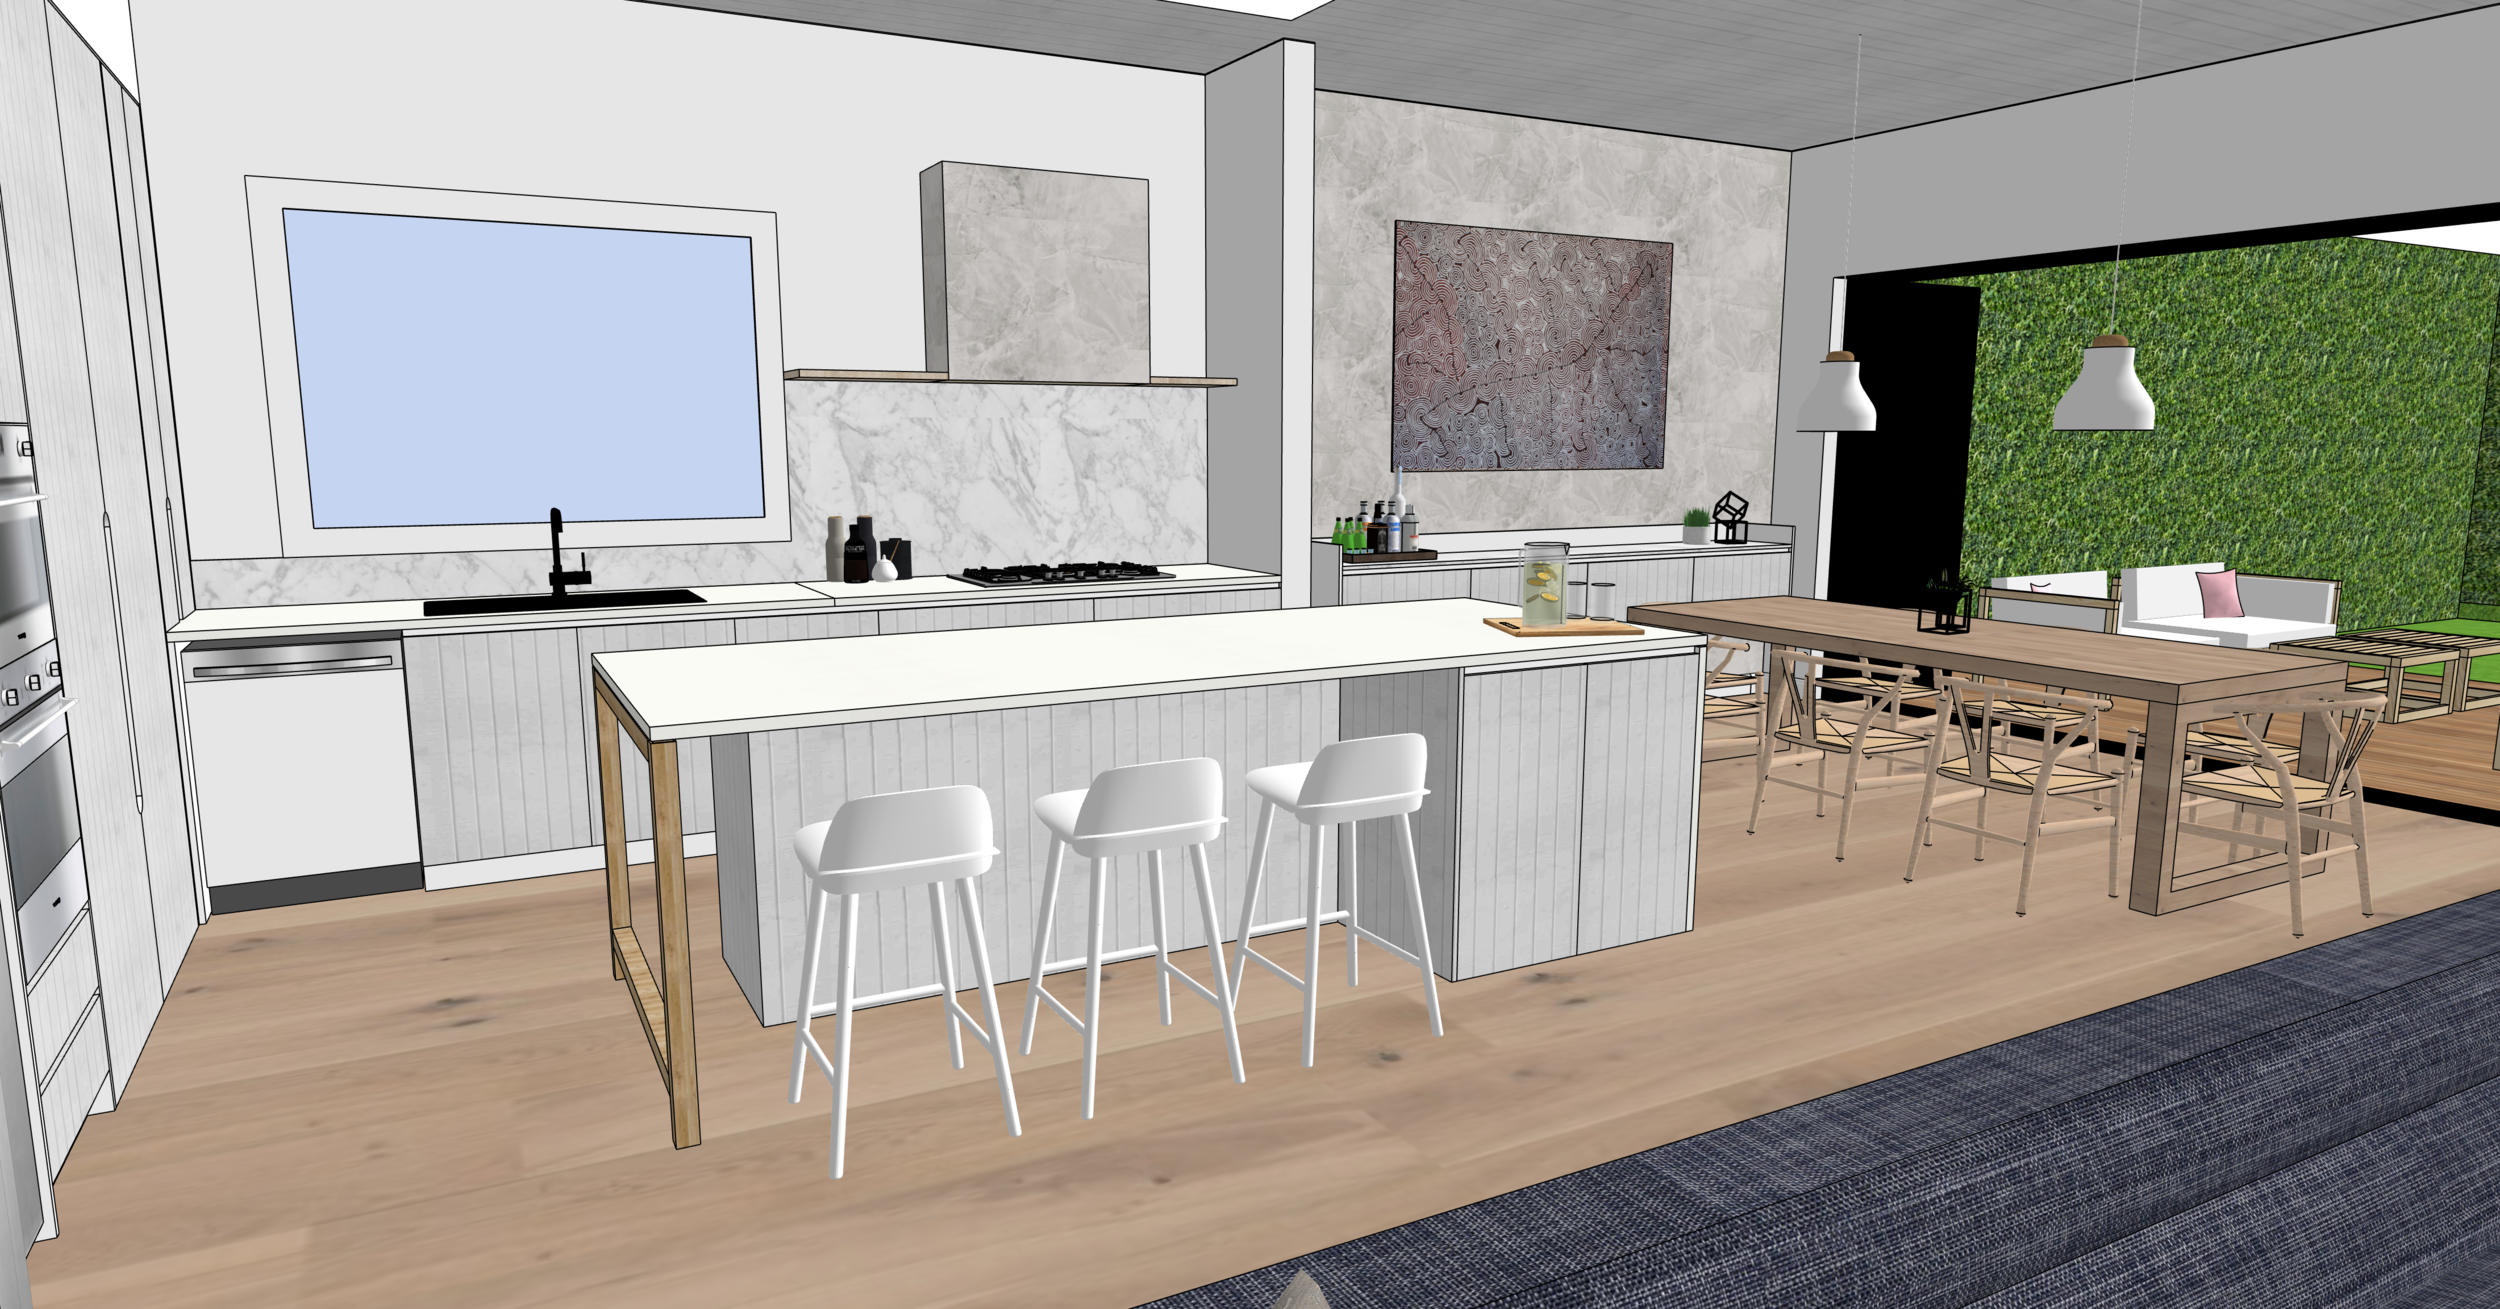
✅ new living, dining, lounge areas - these now all open up to the garden and I think this flow works better. The size is slightly compromised but it’s not too bad. I will push window/bench seat out a little for the dining area which gives an extra 500mm or so (definitely needed!)
✅ stairs to upstairs master bedroom now open to hallway instead of into the formal living room. This will be a bit costly to fix up but it makes the formal living room a much better space - at the moment it feels like a bit of a walk through room and it’s hard to place furniture as well. Also gives me a place to have a small walk in style pantry under the stairs with the new kitchen location.
✅ changes to the formal living room - This will now become a dedicated space - in other versions it’s had so many rooms and stairs etc. coming off it, which made it an unfriendly place to hang out. I’ve also decided to remove some of the existing fireplace joinery and update the existing wood fire with a gas insert as we are much more likely to use it this way (we love a wood fire but not the cleaning, soot and smoke smell all over the furniture!). The lounge is also now oriented better to door and will feel much more open and spacious this way - plus easier to bring Hugo in to the room in his wheelchair to sit with the family.
✅ better study arrangements for my me and my husband - these are now closer together and separated by a bathroom in the middle (which can also be used as a guest toilet). This is better for resale eventually as these could be marketed as single bedrooms if need be - or just flexible spaces - e.g. study, nanny area, kids bedrooms, library/sitting room - all sorts of purposes
✅ much better sized laundry as I no longer have to squeeze a guest toilet in this room as I’ve got that new bathroom across the hall now, which gives us a larger laundry (which is definitely needed in a house of this size!)
✅ outdoor shower added - this is the curved white wall near the pool equipment and washing line
✅ changes to outdoor area including a built in curved seating area which I think will look really good plus be very functional when the family comes over (which can be more than 12 people if everyone comes at once!)
Here’s the new plan for the main level of the house:

Master bedroom (upstairs)
I’ve got two options for the master bedroom. The first one, below, is what we will do if we just renovate the existing space that is already there. We will extend the ensuite and walk in robe further in to the roof line to make those a little larger but other than that this is what is already existing.
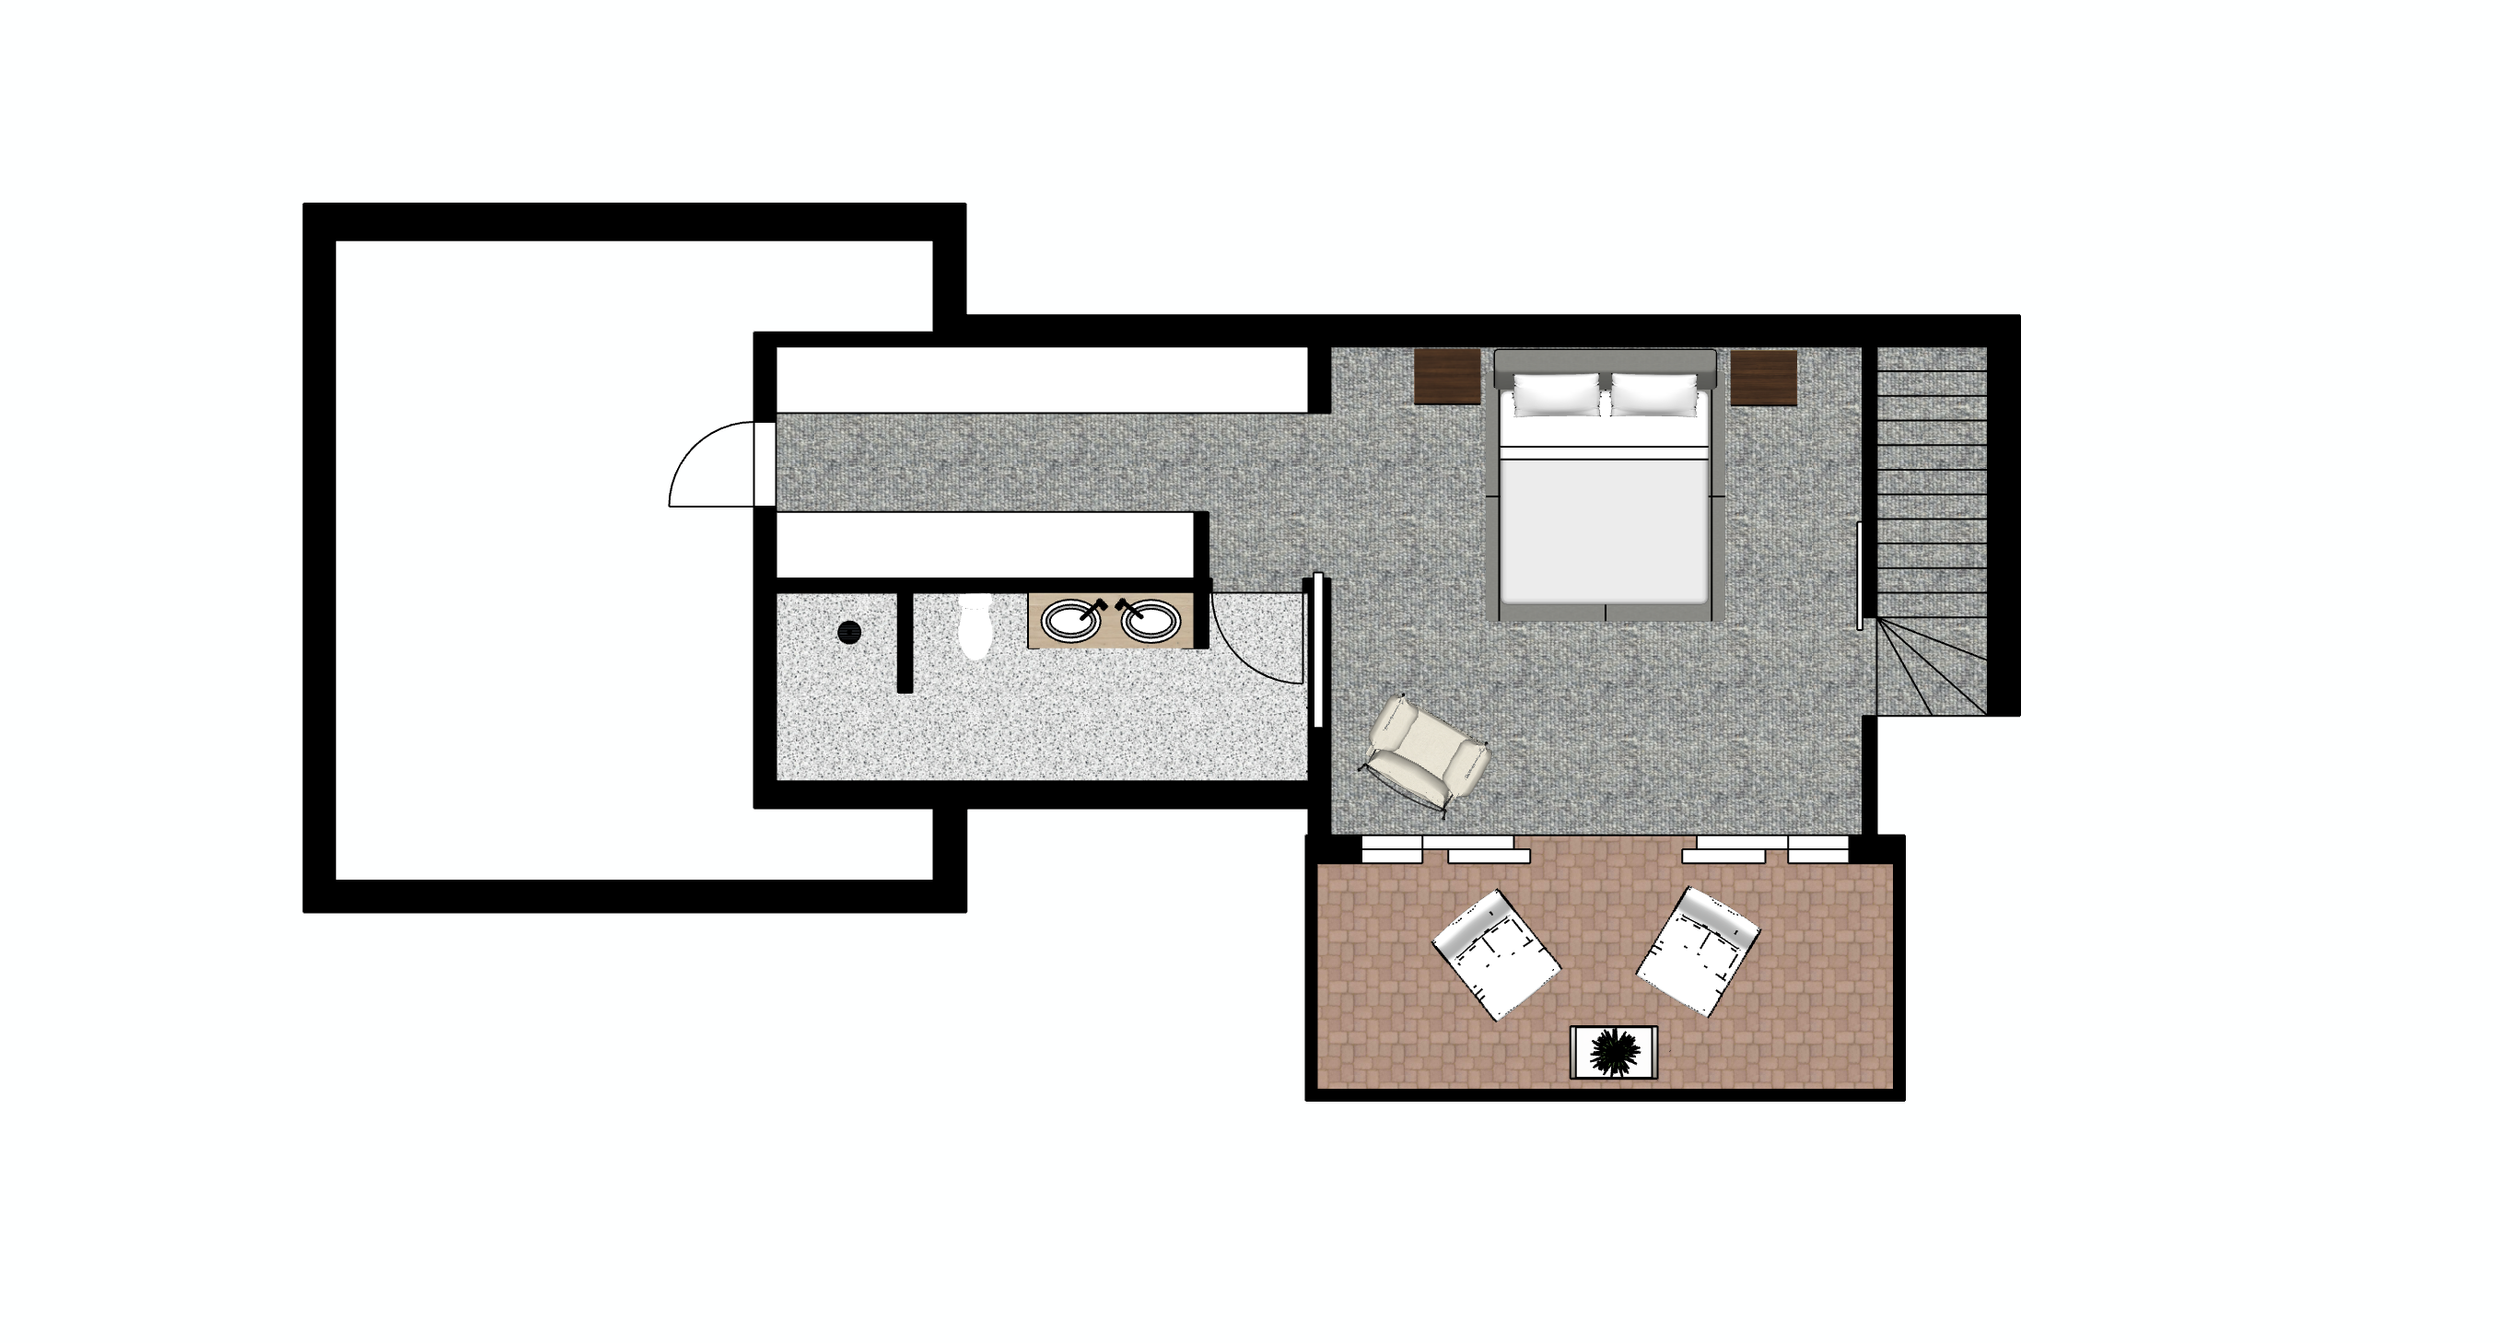
But I’ve also created a second version as I realised that now I can’t get my gym in the basement where I wanted it I have no space to house my Peloton - crisis!!!
So now I’ve built a whole room just for Peloton riding as well as for stretching and meditation, which my me and my husband both do upstairs in our bedroom on the floor at the moment anyway. My husband’s rollers and stretch bands and things are always all over the floor of our bedroom and it drives me nuts!
So I thought why not create a specific space for this :)
This space won’t be a waste for others who might be the house in the future either (if they aren’t health nuts like we are!) - it could be used as a nursery, sitting room, study, library - all sorts of things. So I think it will be a value add no matter what. Having flexible spaces in our houses these days isn’t a bad idea as we all spend so much more time at home these days.
Here’s what else is new up here:
✅ different location for walk in robe and ensuite - probably quite a nice place for them as this is north facing so will get good light
✅ new balcony that will get the north/east aspect - which means we can watch sunrise from up here :)
✅ would LOVE steel doors to open up to the balcony - will see if budget can stretch that far :)
✅ a dorma window with a built in bench seat
✅ I’ve also marked out where I want to put a pelmet for automatic roller blinds and sheer curtain. Behind the curtain on the LH side I will hide an access door to the roof space where we can store suitcases and things - but I won’t have to see this as it will sit behind where the curtains hang - win!
Here’s my new proposed plan so I can discuss logistics and costs of this with a builder:

Basement/garage
This will now be scaled back and basically be a refresh of what’s there - not much we can do down here. I will update the garage door to cheer it up and we need to put in a pump as the area keeps flooding - so that’s a boring thing to spend money on! Other than that this is the footprint we already have done there.

Other renovation updates
Here’s a few other bits of progress to update on since I last posted about our renovation:
✅ we have signed a contract with a pool company - they will start in June or July and should have the pool in my summer - yay! VERY expensive to put in a concrete pool - contract is around $130,000…eek!
✅ our boring plumbing/sewer works are continuing but they have made very little progress as we’ve had about a month of steady rain in Sydney and it put a stop to what they were able to do. At one point we thought perhaps we didn’t need to bother putting in a pool at all - see below for the mess it’s all in! :)


So that’s the latest on our renovation! :)
Learn SketchUp with our fun online course for beginners…
If you want improve your work with design clients or you are about to start renovating or remodeling then you will love SketchUp.
With this software you can mock up an entire home in 2D (floor plans, joinery/millwork elevations, lighting and electrical plans and more) and 3D (renderings and perspective drawings) so you can picture exactly what it will look like when it is finished plus prepare your technical drawings for use with your clients, trades and contractors.
Learning SketchUp will save you time, money, mistakes and so much more! It is a well known piece of software in the interior design and architecture industries and will give you a solid technical drawing skill that will immediately upgrade the professionalism of the work you are doing.
I teach an online course for beginners that is focused specifically on using SketchUp for interior design purposes. We have had more than 10,000 students come through the course with so many fantastic projects designed and built!
We have all sorts of students in the course including designers and architects, cabinet makers, home renovators/remodelers, kitchen and bathroom designers, event planners, landscape designers and design enthusiasts.
To find out more about the courses we have on offer click the link below. And reach out if you have any questions I can help with :)
Enjoy the rest of your day!
Clare x
Dr Clare Le Roy


